
|
||||||||||||||||||||||||||||||||||||||
COUNTRY MANOR INSTALLATION
| INSTALLATION STEPS | |
| Installing the Country Manor system is
easy. Below are specific installation notes for the Country Manor system.
|
|
Step 1: Prepare the base leveling pad. Excavate the base trench to the designed width and depth. Start the leveling pad at the lowest elevation along wall. Step up in six inch increments with the base as required at elevation changes in the foundation. Level the prepared base with six inches of well-compacted angular granular fill. |
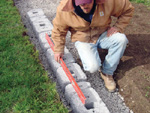 |
Step 2: Install the base course. When installing the first course, be sure the three pinholes are facing up and the open channel is facing down. Place units end-to-end with corners touching. Be sure each unit is levelside to side and front to back. This base course is critical for accurate and acceptable results. For alignment of straight walls, use a string line aligned on the unit pin holes for accuracy. |
|
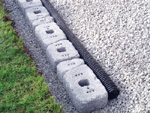
Step 3: Insert the fiberglass pins. Place two pins in each unit. With the Country Manor system, it is easy to build a near-vertical wall, a set-back wall or a wall where intermittent and random units project from the wall face. For a near-vertical design, place pins in center holes. Use the rear holes for one-inch set back. The front hole position allows random units to be pulled forward from the wall to create a more natural variation to offset the wall. |
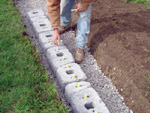 |
Step 4: Install drainage fill, backfill and compaction. Once the pins have been installed, provide 3/4 inch aggregate as drainage fill behind the units to a minimum depth of 12 inches. Fill open spaces between units and open cavities with the same drainage material. Proceed to place backfill in maximum six inch layers with the appropriate compaction equipment. |
 |
Step 5: Install additional courses. Install additional courses starting at the straight wall areas. Place units over pins and center over joint of units below. When stacking the units, pull them toward the face of the wall until it makes full contact with both pins. If pins do not connect with channel but align in open core of upper unit, place drainage fill in core to provide unit interlock with pin. Additionally Keystone adhesive or mortar may be used to secure small units or any other areas that may not align with a pin. |
|
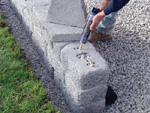
| Step 6: Capping options. The Universal Cap is a three inch high concrete unit that has two textured sides, allowing the unit to have either side as a finished face for straight and curved wall applications. The 12-inch depth from face to face of the Universal Cap allows for a one-inch overhang or shadow effect over each side of the wall. (This shadow effect can be eliminated on retaining walls by pushing the cap flush with the wall plane. Use adhesive or mortar to fasten caps in place.) |
 |